Friday, March 30, 2012

Message in an...egg?


Easter's next weekend, and that means I've got plenty of egg dying and marshmallow Peeps in my future! I've always loved the process of dying eggs and the excitement of an early morning egg hunt. But every year brings the issue of the forgotten egg. It's all fun and games until a few weeks pass and the stench of an old hard boiled egg reminds you of that "they'll never find this one!" hiding spot where you stashed your egg. Ick. Forget the hard-boiled egg and create these stink-free message eggs instead. The best part is that you can customize your message for each egg. Maybe now the Easter egg hunt becomes a scavenger hunt! No time for messages? Slip a dollar bill in the egg for an added incentive. Grab a push pin, a bowl and a few large eggs. Oh, and get your lungs ready, too. 

YOU'LL NEED:
a push pin
a bowl to catch the egg
several large eggs
food coloring or an egg dying kit
vinegar
bowls for the egg dye
several messages on thin strips of paper or money

DIRECTIONS:
1. Use the push pin to carefully push a small hole in the top of the egg, then flip the egg over and make a larger hole in the bottom of the egg (no bigger than 1/4" wide).

2. Blow on the smaller hole until all the egg (whites and yolk) have come out. Repeat until all the shells are hollow. Keep all those eggs and make a giant omelet:) Rinse each egg shell in warm water and let dry overnight. 

3. Dye the eggs according to package directions. Here's where you can get really creative: use crayons to write messages or tape off patterns before you dye. Remember, the eggs are hollow, so they'll float. You'll have to hold them down with a spoon to fully cover with dye. Place back in egg carton to dry completely. 

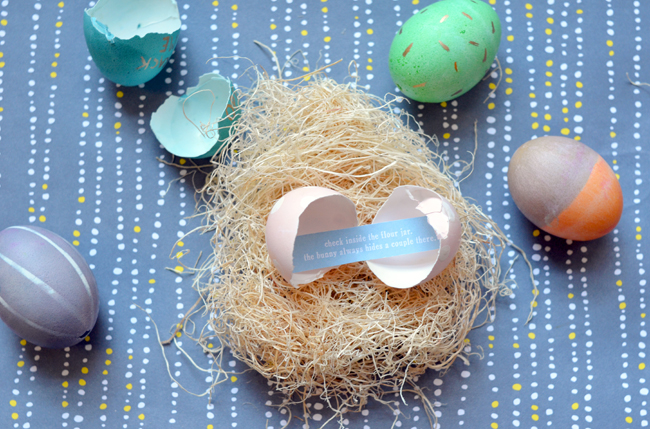
4. Use a paintbrush or chopstick to help curl the edges of the paper message, then coil tightly and slip through the larger hole in the bottom of the egg. Crack the egg open to reveal the message!


I only crushed one egg in the process, but it's pretty tiring, so grab some friends to help.


Use tape to create pattern on the eggs before you dye.


Saturday, March 24, 2012

May the Odds Be Ever in Your Flavor!

This week brings one very exciting movie release and the start of many Sunday evenings glued to the TV. First and foremost was Friday's release of The Hunger Games! Yes, I saw it and I loved it. Although I'm not proud of it, I also may have elbowed a few tweens for the perfect viewing seat. I was, however, proud of myself for sneaking in several bags of delicious flavored popcorn! Movie theatre fare is mediocre at best and overly expensive. I decided to BYOP (that's bring your own popcorn, not Pinot). Popcorn is the obvious choice for movie watching, and I certainly didn't go hungry at The Hunger Games, but it will also come in handy for tomorrow's long-awaited return of Mad Men and next week's premiere of Game of Thrones. Whether it be herb butter, Old Bay Seasoning, caramel, coconut or truffle oil, there are dozens of ingredients that you can use to spice up an ordinary bag of popcorn. To be extra prepared, I made one batch of sweet and one batch of savory popcorn. It came as no surprise to me when my husband requested a S'mores flavored Popcorn. I've mentioned his obsession with s'mores before but I knew things had gone too far when he proclaimed that, had he been in the Hunger Games, surviving on s'mores would be a priority. For the savory popcorn, I decided on a chili-lime combo. I really liked them both, but I seriously cannot stop eating the S'mores popcorn. I just hope this stash will make it to next Sunday. May the odds be ever in my favor!

S'mores Popcorn
makes about 10 cups
INGREDIENTS
1 bag freshly popped popcorn, cooled
1/2 cup light brown sugar, packed
4 Tablespoons butter 

1/4 cup light corn syrup 
1/2 teaspoon baking soda 
2 cups mini marshmallows
4 graham cracker sheets, crushed
1 1/2 cups semi-sweet chocolate chips


DIRECTIONS
1. Line a baking sheet with parchment paper and set aside. Combine the brown sugar, butter, and corn syrup in a medium saucepan and cook on medium-high heat until boiling (about 5 minutes). It will have a caramel color and consistency. Remove from the heat and stir in the baking soda. (Mixture will foam up, which helps coat the popcorn)

2. In a very large bowl combine the popcorn, marshmallows and graham crackers. Drizzle the caramel over the popcorn, gently stirring with a large wooden spoon. Continue to stir until the caramel evenly coats the popcorn mix. Spread mix out onto the baking sheet.
3. Microwave chocolate chips in a heat proof bowl in 30 second increments, stirring often until melted. Use a spoon to drizzle chocolate over popcorn, then set aside until chocolate cools. Break pieces apart and enjoy! Store popcorn in an airtight container for about a week.


Use a natural microwave popcorn without butter or flavorings


Wait a minute, this is really starting to remind me of something.....Yes, a Jackson Pollock painting!! Anyone see the resemblance? (Pollock on the right)


Get the recipe card here.
And now, for a savory popcorn with a kick...

Chili-Lime Popcorn
makes about 10 cups
INGREDIENTS
1 bag freshly popped popcorn, cooled
lime zest from 2 limes, juice from 1
1/2 cup crumbled cotija cheese
1/4 teaspoon chili powder
1/4 teaspoon cayenne powder
1/2 teaspoon salt
3 tablespoons melted butter
DIRECTIONS
Pour popcorn into a large bowl and set aside. Melt butter, then add lime juice, zest, chili powder, cayenne powder and salt. Slowly drizzle butter mixture into popcorn, mixing until thoroughly coated. Stir in cotija cheese. Serve immediately.


Tuesday, March 13, 2012

Pots o' Gold


Legend has it that a leprechaun's secret hiding place for his pot of gold is at the end of the rainbow (at least that's what I learned from eating Lucky Charms). Of course, we all know the end of the rainbow is impossible to reach, seeing as it's a never-ending optical effect. The good news is that you can still have your pot o' gold, and just in time! St. Patrick's day is this Saturday and hopefully you've stocked up on as much Guinness as I have. Yes, I may have married an Italian, but I'm Irish and St. Pat's is one of my favorite days of the year. Dark stouts can add depth and flavor when you cook with it, so I set out to create a dessert that would utilize Guinness. I stumbled across this delicious recipe for Chocolate Guinness pudding from Chef Shane Coffey and I've adapted it for these festive little pots o' gold. I halved the recipe, and substituted the Guinness whipped cream for a Baileys Whipped Cream (See my previous obsession with Baileys here). Overall, these pudding cups were amazing! The chocolate cups are incredibly easy to make and look very fancy once they set.

To Make the Chocolate Pots 
INGREDIENTS 
8 oz semi-sweet chocolate chips 
6 balloons

DIRECTIONS 
1. In a microwavable bowl, melt the semi-sweet chocolate in 30 second increments. Stir after each increment, until chocolate is smooth and melted. 

2. Inflate balloons to about 4-inch diameter, then knot. Wipe balloons with a damp paper towel to make sure they're nice and clean. Hold balloons by the knot and dip into chocolate, rotating to ensure plenty of chocolate coverage. Place balloon, knotted side up, on parchment paper-lined baking sheet. Repeat with remaining balloons to make 6 cups, then refrigerate for at least an hour. 

3. Use scissors to snip a hole in each balloon. Once balloon is deflated, carefully peel away from chocolate. Continue to refrigerate cups until needed.


To Make the Guinness Chocolate Pudding
INGREDIENTS
4 large egg yolks
½ cup sugar
¾ cups Guinness Stout
2 cups heavy cream
4 ounces high-quality dark chocolate (70-72% cacao), chopped
1 tbsp. Baileys Irish Cream
Gold sprinkles


DIRECTIONS
1. In large mixing bowl, whisk together egg yolks and sugar.

2. Open can of Guinness and pour into saucepan. Add 1¼ cups cream and whisk to combine. Set over medium heat, whisking occasionally, until bubbles begin to form at the edges. Remove from heat, add chocolate and whisk until smooth and all chocolate is incorporated.

3. Slowly pour hot chocolate mixture into eggs, whisking constantly. Return mixture to saucepan and set over medium-low heat.

4. Cook, whisking constantly, until mixture thickens. Mixture should be thick enough to coat the spoon. Pour pudding into a bowl and cover with plastic wrap. The plastic wrap can touch the pudding surface to prevent skin from forming. Refrigerate overnight, or until chilled and set.

5. Beat remaining cream until soft peaks form. Add 2 tbsp. Baileys Irish Cream and beat until stiff peaks form.


Assemble the pots o' gold
For an added touch o' gold, I painted edible gold pearl dust around the rim of the chocolate pots. You can buy it at any cake decorating or craft store. Had I actually found my pot at the end of the rainbow, I'd probably use this real gold leaf to garnish my pots. 

These are best assembled just before serving. Spoon pudding into chocolate cups, leaving enough room for the whipped cream. Top each pot with a large spoonful of whipped cream and garnish liberally with gold sprinkles. Happy St. Patrick's Day!


Wednesday, March 7, 2012

Gettin' Crafty

Candies and Chocolates: $80
I have a slight (serious) obsession with housewares. Vases, cake stands, platters, pitchers and more...I love them all. Seeing as I live in a shoebox apartment with my husband and our two dogs, I don't have room for much more. But, just because I don't have room for them doesn't mean I can't swoon all over the best NYC has to offer. In my opinion, the John Derian store in the East Village has it all. If I could, I'd buy about a thousand of these decoupage traysTo do that, however, I'd need about a million bucks. 

Lucky for me, I can get crafty with the best of them. I know the world of decoupage might bring up images of crazy craft ladies or Girl Scout camp, but to me it's a simple solution to achieve an otherwise un-achievable serving tray. 

I set out to replicate a John Derian tray and purchased a clear 5x8" glass tray for about seven bucks from here. One thing to remember with decoupage is that the thinner the paper you use, the better the final product. If there are slight curves in the glass, and if your paper is stiff, it will wrinkle when you start 'podging. 

I used white tissue paper and a magazine (FOOD & WINE, of course!). Food images always create beautiful color patters. Before you pass over that photo of beets or green beans, try cropping it to create a beautiful abstract image. I cut about 20, 1" petal shapes, but feel free to cut any shape, size, or color. To add a different shape and texture, I cut the white tissue paper into 20, 1" circles. 


To truly mimic the fancy decoupage trays, you MUST have silver or gold paint. I love gold accents, so I taped off and painted random sized gold stripes.

Now this is where things get exciting. I wanted to make my tray a little different, so I printed out my favorite chocolate chip cookie recipe on plain copy paper and cut it into thin strips. Then, using a paintbrush and the Mod Podge, I glued the recipe strips (face down, of course) then painted over them to seal it all in. 


The rest is up to your imagination! I arranged the clippings by color and created a wave pattern. A couple tips: Don't use too much glue or your paper will wrinkle and make sure to seal it all in with one final thin layer of glue. 


Trim and seal the edges with the Mod Podge, then paint the edges with your gold or silver paint. You could also use a metallic paint pen. 


And there you have it! Your very own decoupage tray. Now, how great would it be to give someone this homemade gift (recipe included). You should probably throw in the cookies, too!